Understanding How Machine Vision Performs Quality Control Tasks
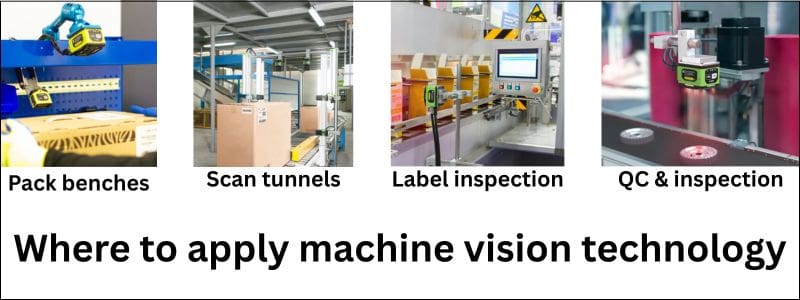
In modern industrial production, ensuring product quality and eliminating defects is critical—not only for cost control, but for brand reputation, regulatory compliance, and operational efficiency. This is where machine vision systems play a key role. Specifically, companies like CSSI’s partner Zebra Technologies offer machine vision technology designed to perform tasks such as defect detection on production lines.
In this post we will discuss how a machine vision system is able to perform defect detection: the main components involved, how they fit together, and what the overall workflow looks like.
What is machine vision & why is defect detection important?
What exactly is meant by the phrase ‘machine vision’?
Machine vision systems use hardware + software to give machines the ability to “see” objects, extract information from images, and make decisions (such as pass/fail, sort/reject) based on what is seen.
In the context of defect detection, machine vision systems are used to automatically inspect components, assemblies or finished goods for anomalies such as scratches, dents, missing parts, misalignment, incorrect printing, surface defects, etc. This replaces or supplements manual inspection with capabilities beyond that of human vision, enabling greater speed, consistency, repeatability and often cost savings.
Main components of a machine vision defect-detection system
So what are the key building blocks of a machine vision system?
It’s important to think of machine vision as a computer vision system, as opposed to a single product. That’s because a machine vision solution for defect detection typically consists of several interacting components, each fulfilling a specific role. Using Zebra’s product architecture as a reference, we can group the components into these broad categories:
1. Image acquisition hardware
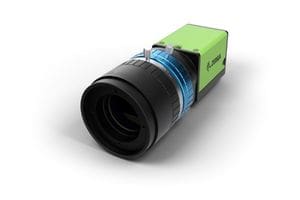
Cameras / sensors: To capture images (2D) or scans/point-clouds (3D) of the object under inspection. For example, Zebra’s machine vision camera offerings (e.g., the CV60 series) support high-resolution CMOS sensors, color or mono, with GigE or USB3 interfaces.

Lighting / optics / lenses: Proper lighting and optics are critical for selecting the field of view, resolution, contrast and image quality so that defects can be reliably detected. While not always spelled out in product listings, good lighting design is foundational. Zebra offers some camera products with integrated lighting to solve this problem without requiring further external items.

3D scanners / sensors: For more complex surfaces, shapes or features, 3D sensors provide extra information. Zebra offers 3D vision sensors (for example dual-camera + laser systems) to capture height/profiles and detect defects that may not appear in simple 2D imaging.

Frame grabbers / vision controller hardware: In higher-end systems, cameras may feed into frame grabbers or vision controllers (industrial PCs) that manage capture, preprocessing, triggering, and hand off the image data for analysis.
2. Image processing & analysis software
Once images or point clouds are captured, software analyzes the visual data for object recognition and object detection. The core software tasks include preprocessing (noise reduction, contrast enhancement), segmentation (isolate the part), feature extraction (edges, textures, geometry), comparison to reference models/standards, and finally decision logic (is it acceptable or a defect?). Machine learning enables the software to update its model for more accuracy over time.
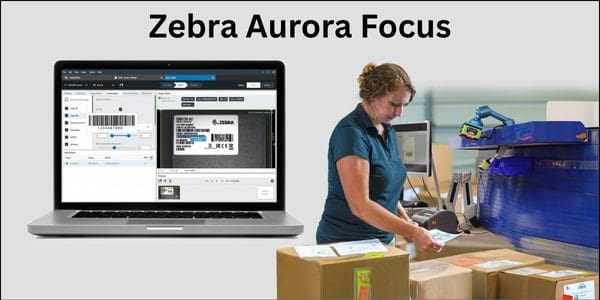
Zebra Aurora suite of machine-vision software is designed to accomplish these analytical tasks:
- The Aurora Vision Library (SDK) for programmers, offering tools for processing 2D/3D images and OCR (optical character recognition)..
- Aurora Vision Studio – a graphical, no-code/low-code environment to build vision applications via drag-and-drop filters.
- Aurora Design Assistant – for more guided workflows to build applications, especially for deep learning use cases.
- Deep-learning / anomaly-detection tools – newer additions enabling unsupervised / semi-supervised learning of defects. For example, Zebra’s new deep-learning features allow training on “normal” (good) parts and detecting deviations.
3. Integration & automation interface
A vision system doesn’t exist in isolation; it must integrate with production equipment, conveyors, reject mechanisms, PLCs, HMI (human-machine interface) and higher-level control/MES (Manufacturing Execution Systems). Key integration blocks include:
- Triggering / synchronization: Telling the camera when to capture (e.g., when a part is in position), synchronizing with motion/line.
- I/O / communication: Digital I/O (e.g., to signal a reject arm), or higher-level communication protocols (Ethernet, OPC UA, etc). Zebra includes I/O cards as part of its offerings.
- User interface / monitoring: Operators may need to review inspection results, override decisions, look at logs or analytics dashboards. The software suite often supports HMI components.
- Data logging / traceability: For quality assurance, records of inspection results, images of defects, timestamps, part IDs, may be collected and integrated.
4. Mechanical / physical system setup
Though not strictly “vision hardware/software”, the mechanical setup matters a lot for defect detection:
- Mounting / positioning: Cameras/sensors must be mounted rigidly and aligned so that the object is in the correct field of view and orientation.
- Conveyor / motion control: The object may be moving (on a line), so synchronization matters.
- Reject mechanism / marking system: If a defect is detected, the part may be removed or flagged.
- Environment control: Vibration, lighting variability, ambient noise, dust/particles and variable backgrounds must be managed to ensure reliable vision inspection.
How the system works—step by step
Putting it all together, here’s a typical workflow of how a vision system like Zebra’s might perform defect detection:
- Setup / calibration
- Identify the part(s) to inspect and define what constitutes “good” vs “defective”.
- Choose and install camera(s), lighting, lenses, mountings.
- Configure field of view, resolution, exposure, trigger method (e.g., conveyor sensor triggers camera).
- If using 3D sensors, calibrate depth/laser/point-cloud settings.
- In the software environment, define or import reference images (good parts), set up inspection logic or train the model.
- Image capture (runtime)
- A part arrives in the inspection zone (e.g., on a conveyor). A trigger (for example a sensor) signals capture.
- The camera snaps an image (or sequence) under controlled lighting. If motion/multiple angles are needed, multiple cameras or shutters may capture.
- If a 3D sensor is used, it may scan the surface and produce a point cloud or height map.
- Pre-processing
- The raw image is processed: e.g., apply filters to reduce noise, enhance contrast, correct for lighting non-uniformity, rectify perspective if needed.
- Possibly convert to grayscale, thresholding, edge detection or segmentation to isolate the region of interest (the part surface).
- Feature extraction / comparison
- The software extracts features of interest: edges, contours, texture patterns, geometric dimensions, 3D profiles.
- The extracted features are compared to expected “good” features or patterns. For example, a surface that’s supposed to be smooth – any scratch or dent changes the texture or geometry.
- In deep-learning or anomaly-detection approaches, the system may compute a “difference” from a learned normal model. For example, Zebra’s anomaly-detection tool can be trained with only good‐part images and then highlight deviations as defects.
- Decision logic
- Based on the comparison, the software decides: pass or fail. If a deviation exceeds thresholds (dimension out of tolerance, missing part, scratch present), mark as defect.
- Some systems provide heatmaps or visual overlays indicating where the defect is. Zebra’s tutorial video shows how their “Detect Anomalies” tool uses a heatmap.
- Output / action
- The decision is communicated: for example, a “reject” signal is sent to remove the defective part.
- The system logs the inspection result, possibly saves the image (especially for defects), links to part ID.
- The HMI may show a real-time dashboard of number of defectives, pass rate, images of recent failures, operator alerts.
- The system may feed data into MES/ERP for quality traceability and analytics (e.g., defect trends, cost of scrap, root-cause analysis).
- Continuous improvement / feedback
- Over time, the inspection logic or model may be refined: adding new defect types, adjusting thresholds, extending to new part variants.
- Deep-learning modules may be retrained as product changes occur (e.g., new material, new surface finish). Zebra’s recent updates allow easy retraining of models via their Aurora suite. (Zebra Technologies)

Key considerations / best practices
When implementing a vision-based defect detection system, there are a number of things to keep in mind:
- Image quality matters: If lighting is poor, camera resolution too low, or the field of view mis-aligned, defect detection will suffer. Good lighting, proper optics and mechanical stability are essential.
- Define “normal” clearly: Especially if using anomaly-detection (unsupervised) approaches, you need a robust set of “good” part images so the model can understand acceptable variation. Zebra’s anomaly tool trains on normal parts only.
- Set tolerances appropriate to process variation: You need to balance false positives (good parts flagged as defective) and false negatives (defects passed). Too strict leads to waste; too loose leads to quality problems.
- Consider speed vs resolution trade-offs: On a fast production line, you may need high frame rate or fast capture; yet higher resolution or 3D scanning may slow things. The system must keep up with throughput. The “What is machine vision?” article notes that frame rate, processing capability and complexity determine defect detection speed.
- Integration with automation/line: The vision system must trigger correctly in context of the production line, interface properly with PLCs/I/O, and ensure the rejected parts are physically removed or flagged.
- Robust to variation: Real environments involve variation (lighting changes, part orientation, background, vibration). The vision system must be robust and tolerant of expected variation while still sensitive to real defects.
- Data logging and traceability: For many industries (automotive, electronics, medical, packaging) you’ll need traceability of inspection results, images of failures, analytics of defect trends.
- Scalability and maintainability: As product lines evolve, the vision system should be easy to update (e.g., new part, new surface finish). Zebra’s platforms emphasize “hardware-agnostic” software and easier adaptability.
- Choosing between traditional “rule-based” vs deep-learning methods: Traditional systems (edge detection, thresholding, templates) still work well for many structured inspection tasks. But for unstructured defects (scratches, complex surfaces, variable shapes) deep learning / anomaly detection may offer better results. Zebra has added deep-learning tools to their Aurora suite for exactly this reason.
Case Study: Detecting dents on a metal cover
Let’s walk through a concrete hypothetical example consistent with Zebra’s offerings: inspecting a stamped metal cover for dents or surface scratch defects.
- The part moves on a conveyor to the inspection station. A sensor triggers the camera.
- A high-resolution mono camera with ring lighting captures an image of the cover. (Lighting ensures uniform illumination and highlights subtle surface deviations.)
- The image is pre-processed: perhaps smoothing, background subtraction, alignment of part.
- The inspection region is defined (the cover top surface). A deep-learning anomaly-detection model (trained on many “good” covers) computes a deviation heatmap: any area that diverges beyond a certain threshold is flagged.
- The software checks whether the deviation meets criteria for “fail” (e.g., dent depth > X mm or scratch length > Y mm).
- If fail: the system sends a reject signal; the conveyor diverter pushes the defective part into a scrap bin. The image of the defect is stored with timestamp and part ID. If pass: the part continues down line.
- The operator sees on the HMI a summary: “Today: 42,123 covers inspected, 17 failed (0.04 %).” The data logs feed into quality analytics to identify trend (e.g., increased defect rate correlating with a certain stamp die change).
- If die wear increases, the inspection system may start seeing more dents; the QA team sees the trend, triggers maintenance. The system may also be retrained with new “good” samples after die replacement.
Why Zebra is a Great Match for your Machine Vision Project
CSSI is an authorized machine vision partner for Zebra Technologies. Here are a few reasons why Zebra’s machine-vision ecosystem is a great fit for your next project:
- Zebra offers full stacks: smart camera options, 3D machine vision sensors, frame grabbers, vision controllers, I/O cards, and software (Aurora suite) for building inspection systems.
- Zebra’s software now incorporates deep-learning / anomaly-detection tools, which are increasingly important for more complex defect visual inspection use cases.
- Zebra highlights that machine vision is hardware-agnostic and designed to support both traditional rule-based and newer AI-based inspection workflows.
Let’s Discuss Machine Vision for Defect Detection and More
Defect detection via machine vision is a powerful and increasingly accessible way for manufacturers to raise quality, reduce waste, perform automated inspection tasks. A well-designed vision system doesn’t simply “see” defects better than the human eye—it’s engineered end-to-end (from lighting and optics to algorithm to mechanical integration) for the specific inspection task. A machine vision application is your ideal entry point into using artificial intelligence technology in your business.
Contact CSSI to explore how machine vision can improve your quality control and reliability. Our Zebra-certified experts are available to consult with you.