On-Demand Webinar: Sending Vendor Payments by EFT in GP
Interested in learning how to send vendor payments by EFT in Dynamics GP? In this helpful session, you’ll learn about why and how to utilize EFT for paying vendors.
Here are helpful downloads referenced in the webinar:
Why utilize EFT for vendor payments?
Save on postage and reduce check-printing and envelope-stuffing time by emailing vendor remittances
Vendors appreciate having their payments transmitted directly to their bank accounts
Create EFT payment batches in the same way you create check batches
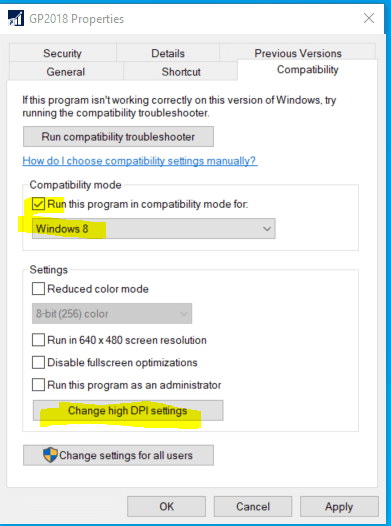
Do you have a Windows 10 machine? And are your GP fonts too small? You’re going to spend long hours struggling to read your screen, which will result increasingly in eye pain and frustration. Don’t settle for font sizes which are too difficult to read. Try this!
Log out of GP
Right-click on your GP desktop icon and select Properties
Click on the Compatibility tab
Make the changes highlighted below
Under Compatibility mode, check the checkbox and change the compatibility to Windows 8 or 7
Click on Change high DPI settings and check the “Override high DPI scaling behavior” box
We hope that knowing how to change GP font size is a helpful tip for you. Do you need more GP technical support or help with upgrades? The GP experts at CSSI are here to help. Please contact us to learn how we can help.
There are known GP issues caused by March 2021 Windows updates:
When you print documents in GP that contain images, black boxes appear instead of the images. The temporary workaround was to roll back the update.
Another issue was you might receive an APC_INDEX_MISMATCH error with a blue screen, and possible PC crash, when attempting to print to certain printers in some apps. This issue affects a subset of Type 3 printer drivers and does not affect printer drivers that are Type 4.
Microsoft GP Fix for March 2021 Windows Update
On Friday, March 19th, Microsoft released a fix for these updates. However, the fix is having issues on Auto Updates for windows right now, which they hope to resolve soon, but you can install it if you want manually.
Find the “Unexpected results when printing from some apps or to some printers” issue in the list of resolved issues, and click on the link to the Resolved KB:
This will take you to a page which outlines what Windows version was released to fix the black box issue (should all show March 18th as the release date):
This update is not installing through the automatic Windows Update installer correctly, so you will want to install using the Microsoft Update Catalog, which is linked at the bottom of the page:
This will take you to the final page in the process, with a list of various installs. Find the one that matches your environment (i.e., 32 or 64bit), and click the download button the right.
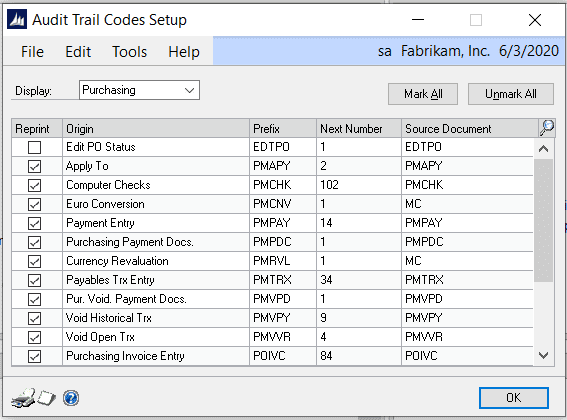
Here’s a quick explainer on how to setup GP audit trail code prefixes.
When you post a batch in one of the subsidiary modules (Payables, Receivables, etc.), it posts to the general ledger and uses an Audit Trail Code for the Financial Batch ID.
To find out what the Audit Trail Code prefix represents, go to Microsoft Dynamics GP > Tools > Setup > Posting > Audit Trail Codes.
Select a module in the Display drop-down list.
Need GP support? We’re here to help! Contact CSSI to discuss how we can help you with GP today.
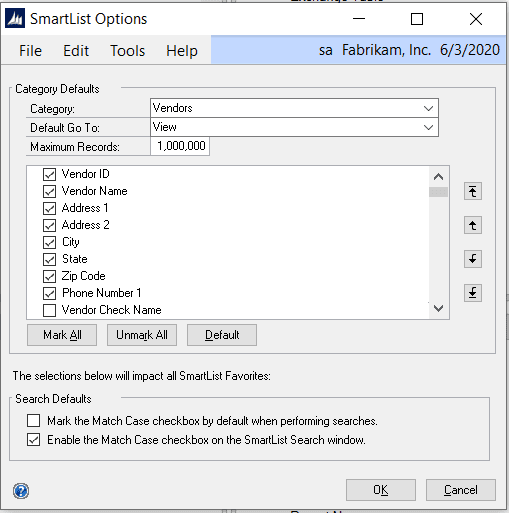
Wondering how to use GP SmartList Options?
Use this window to set up SmartList Defaults, such as Maximum Number of Records, Default Go To windows and determine which columns are visible, by default, for specific SmartList favorites.
Go to Administration > Setup > System > SmartList Options
Select a Category (SmartList folder)
Default Go To – this is the window that will open when you double-click on a row in this particular SmartList
Maximum Records – set this to a large number so that you don’t have to remember to change this every time you create a new SmartList Favorite.
Check or uncheck fields to define the default columns for this list. Rearrange the columns using the up and down arrows on the right.
Are you or your finance team in need of GP training or support? The experts at CSSI are here to help! Contact us today to learn more about how we can help.
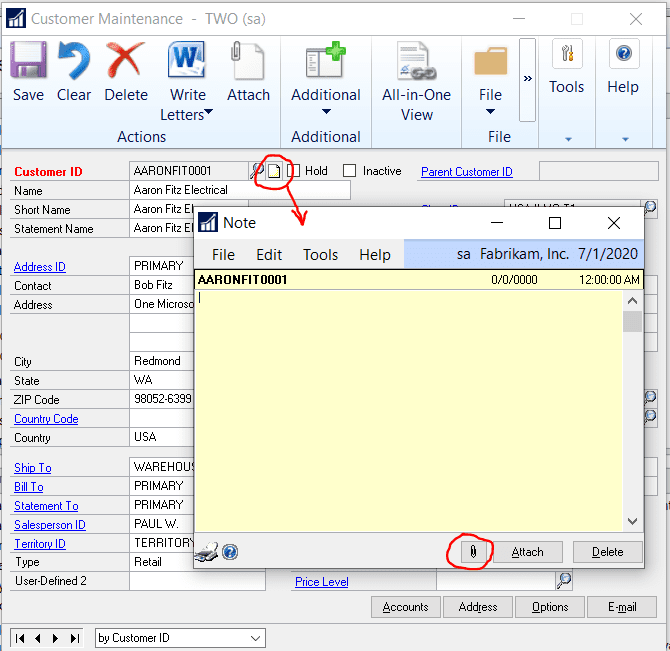
How to scan documents within GP
Are you aware of how easy it is to scan and attach documents to Dynamics GP transactions and master records? This new Document Attachment functionality was added in GP 2013 R2. All you need is a Windows Image Acquisition (WIA) enabled scanner/printer and a little bit of setup.
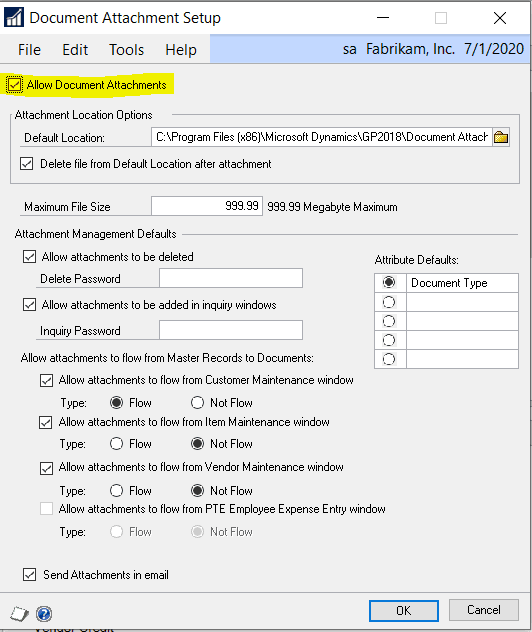
1. Document Attachment Setup
To enable Document Attachment, go to Microsoft Dynamics GP > Tools > Setup > Company > Document Attachment Setup
Check the “Allow Document Attachments” box
Press the F1 key (or go to Help > About This Window) for more information on the other setup options in this window
2. Using Document Attachment
Open almost any GP window, select a record then click on the Attach button
Or, click on the Notes icon then click the paper clip icon here
Click on the Scan button in the Document Attachment Management window
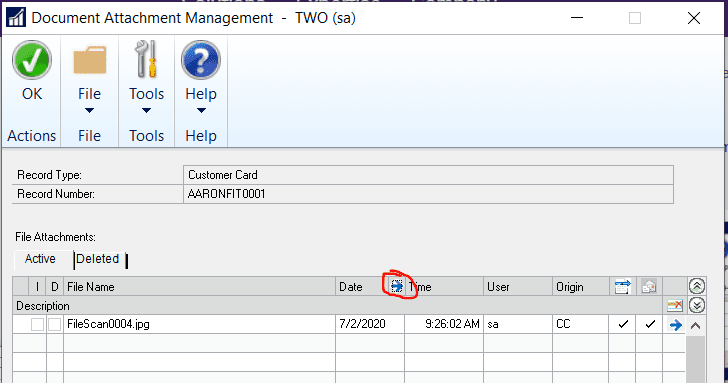
If you already have a scanned image of a paper document, you can click on the Attach button to browse to that image file.
You can then view the status of an attachment by clicking on it to select it then click on the blue arrow to the right of Date. This will show you the date and the time a user has attached, deleted or scanned the image. If, in the setup, you marked to allow a document to flow, this inquiry screen will also show the date and time the document flowed to a transaction.
Once a record has an attachment, the Attach image changes to this
We hope that this helps with document management! Now that you know how to scan documents within Dynamics GP, is there other support or training which your team needs? CSSI’s team of Dynamics GP experts is standing by to support you. Contact us today to learn more.
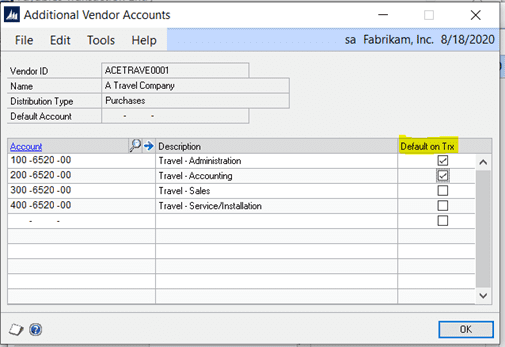
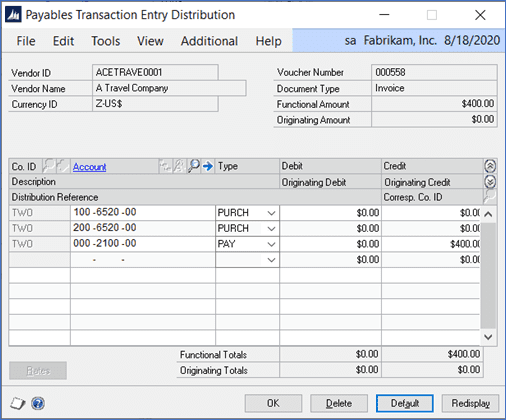
Multiple Default Purchase Accounts for Vendors
If you’ve been entering payables transactions in GP, then you probably already know that you can assign a default purchase accounts to each vendor. BUT, did you know that you can assign multiple accounts to a vendor?
Here’s how:
In the Vendor Account Maintenance window, click on the Ellipse button (button with 3 dots) to the right of the Purchases account.
Enter the additional accounts that will used for this vendor and check those accounts that you want to Default on the Transaction.
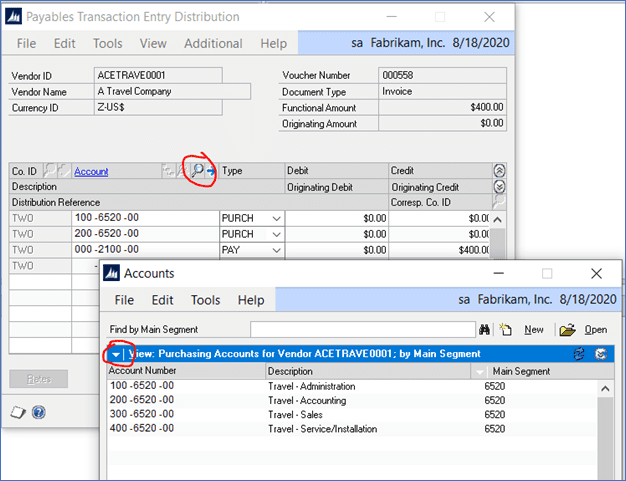
When you create a payables transaction for this vendor, and go to Distributions, the Default accounts will fill in. All you need to do is enter the amount for each account.
And, when you click on the lookup icon to the right of Account, all the vendor’s default accounts will appear. You can change to look up to show All Accounts by clicking on the down arrow to the left of View (in the Accounts lookup window.)
If you issue monthly finance charges, and you have some of those customers who never pay theirs, you can easily waive these finance charge transactions in GP. By using the Waive process, this will reverse the posting of the original finance charge.
And then when you drill down to that the finance charge, you can see that it’s been Waived.
You can also view waived finance charge totals in SmartList by Life-to-Date (LTD), Year-to-Date (YTD) and/or Last Year (LYR).
In this video, we present a custom report created in SQL Server Reporting Services (SSRS), but also possible to use in Crystal Reports or Power BI.
What does this SQL Server Reporting Services Report Do?
This custom SSRS report lists items that are needed for current open sales orders in Dynamics GP. It also shows a running total of the projected available quantity for each item, based on the requested ship date or the promise date for PO’s. Finally, the report will highlight items with quantity available of 0 or less.
If this SSRS report would be useful in your business, or if you would like assistance in report design, creating other custom reports in SSRS, Crystal Reports, or Power BI, or custom code and applications, please contact the report designer experts at CSSI. CSSI can also assist you with custom programming services, developing unique high-value applications for your business.
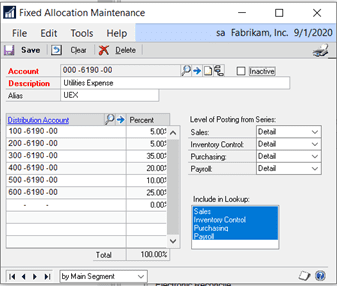
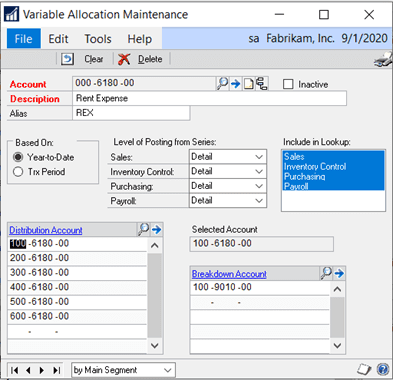
Using GP Allocation Accounts
In GP, you can use a Fixed or Variable Allocation account to automatically distribute fixed or variable percentages of a transaction among several distribution accounts.
1. Fixed Allocation
Go to Financial > Cards > Fixed Allocation
Enter an account number and description
Enter each Distribution Account and its percentages
Click on Save
2. Variable Allocation
Go to Financial > Cards > Variable Allocation
Indicate whether you want to calculate the percentages based on the year-to-date balance or on the transaction period balance of each breakdown account
Select the series where you expect to use this allocation account; the allocation account will appear in all lookup windows in the selected series
Enter the distribution account (the account that will be posted to)
Enter breakdown accounts by selecting a distribution account then enter the corresponding breakdown account on the right. (The balances of the breakdown accounts determine the percentage that will be posted to each distribution account.)
3. Using GP Allocation Accounts
When you use an allocation account in a transaction, you won’t see the breakdown of the distributions until the transaction is posted to general ledger
An allocation account cannot be assigned as a distribution account for another allocation account
You CAN assign an allocation accounts to a vendor as a default purchasing account