Tag Archive for "microsoft dynamics"
How to Use Advanced Lookups in GP

Create Extra Sorting & Lookup Options in GP

Did you know that in GP, you can add extra sorting and lookup options for a user to access quickly without needing to go into Custom Sort?  Advanced lookup fields are available on 14 Lookup windows, and you can add up to 4 additional fields.

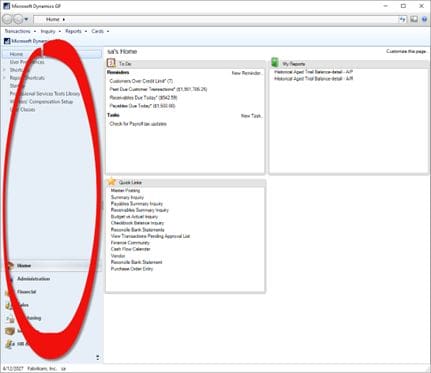
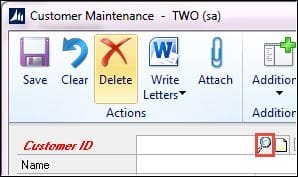
We’ll use Customer Lookup for example.   Go to the Customer Maintenance Window (Sales > Cards > Customer).  Select the Lookup icon to go to the Customers and Prospects window.

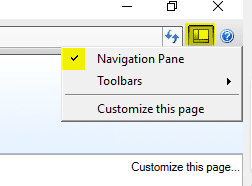
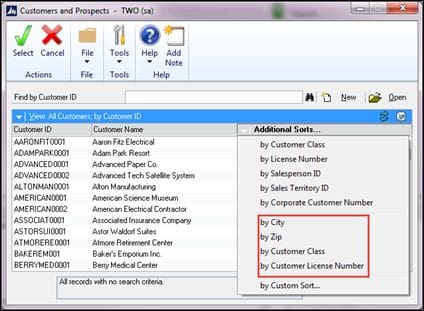
On the Customers and Prospects window select the down arrow next to Additional Sorts.

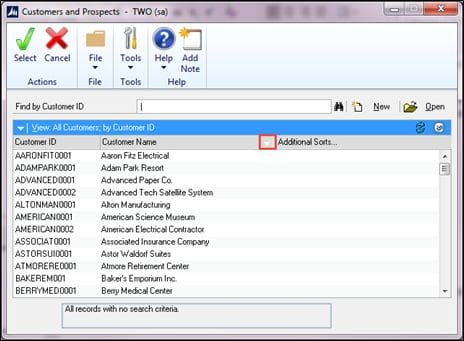
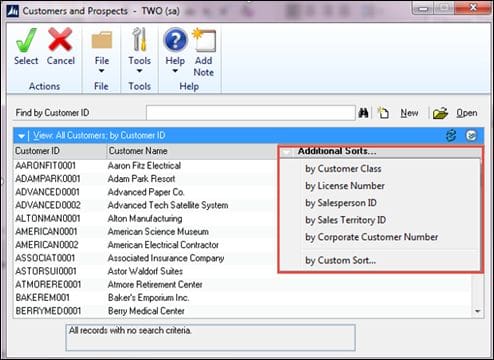
This will display the current sort options available.

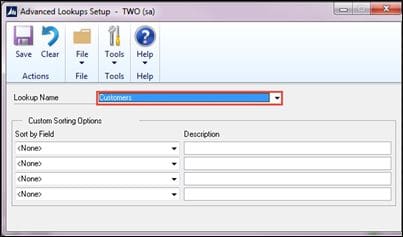
The next step is to add a “by Custom Sort”.  Find the setup for Additional Sorts by going to Microsoft Dynamics GP > Tools > Setup > Company > Advanced Lookups.  This will open the Advanced Lookups Setup window.  Select the Lookup Name to be modified.

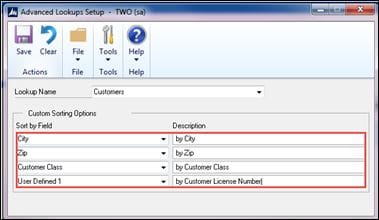
Select the Field(s) you would like to add as a “Sort by” option.  The description is editable so you can change the description.  Note below where the field User Defined 1 has had the description changed to be more meaningful.  Save the changes made to the lookup.

The next time you go to the Customer lookup window, the Additional Sorts will be available for use.

Need GP Support?

CSSI is available to help with your GP technical support and training needs. We can assist with GP upgrades, customizations, enhancements, trouble-shooting, and report writing. Please contact us for GP help.

General Ledger Mass Modify

Mass Modify is a tool that can help you quickly create, update, or renumber large groups of General Ledger accounts all at once.

You can generate many new GL accounts based on existing ones using:

  • Segment (change one segment across a range)
  • Range (copy a block of accounts)
  • Mask (replace part of an account number)
  • Wildcard (select accounts based on patterns)

This is useful when:

  • Adding a new department
  • Rolling out new natural accounts
  • Creating new cost centers

NOTE: Before using this tool, be sure to have a current backup!

To copy a range of accounts:

  1. Go to Financial > Cards > Mass Modify
  2. Select Copy in the Modify field
  3. Enter the range of accounts you want to modify in the From and To fields
  4. In the New Account Mask, enter the new segment number
  5. For Display, choose Selected Range to show the range of accounts to be copied
  6. Click on Modify to complete the process
  7. The fields in the window will be cleared when the process has been completed

GP Upgrade Support

CSSI can help with your GP upgrades! Our experienced GP team can guide you through the process of getting current, even if you have slipped several versions behind! Contact us for GP upgrade help.

GP Tip – Cleaning Up Auto Complete Selections

Here is an older (but still handy!) tip…  GP has this feature called Auto Complete that remembers what a user had previously typed into a field.  The only problem is that it remembers the invalid data, too. 

You can remove these unwanted values that appear in your list by right-clicking on a selection then clicking on “Remove From List”.  It’s as simple as that!

You can use the AutoComplete Setup window (Microsoft Dynamis GP > User Preferences > Auto Complete) to specify the number of days when unused entries should be removed and the number of entries that can be saved for each field.  You also can remove all existing AutoComplete entries.  If you decide not to use AutoComplete, you can unmark the Show AutoComplete Suggestions option.  Because this is under User Preferences, this is a by-user setting.

GP Support from CSSI

Do you have a solid GP support partner? We can help. For more GP support and help with upgrades or training, please contact CSSI.

Assigning Process Holds to Sales Documents

You can use the Sales Process Holds Setup window to create process holds to assign to your sales documents.  Process holds are user-defined restrictions that control the processing of sales documents at different stages of the sales cycle.

Some examples of process holds are:

  • Prevent posting of documents until a manager approves the transactions
  • Restrict the printing of invoices until addresses have been verified
  • Stop the order fulfillment process because a part has been recalled by the manufacturer
  • Prevent the transferring of a quote to an order if the customer is over its credit limit

You can set up passwords to further restrict processing.  The user must enter the password to remove holds from documents.  If you do not use passwords, you can set up a process hold just to remind the user to complete a task before processing a sales document.  Once the task is completed, the user must remove the hold from the document before processing occurs.  You can apply process holds to any sales order processing document type.

To set up process holds, go to Sales > Setup > Process Holds.  Enter an ID and description.  You can assign a password or leave it blank.  Check which processes you want to restrict with this hold.

To assign a Hold to a SOP transaction, go to Sales > Transactions > Sales Transaction and select a document. Click on the Go To button and select Holds.

Select a Process Hold ID and click on Assign. You can assign more than one Hold to a document.

Once a Hold is assigned, you will see a red circle indicating a Hold is on this document. 

To remove the Hold, click on the Go To button, select Holds and Remove.

Add the Hold column to a Sales Transaction SmartList to see all documents on hold.

GP Support from CSSI

For GP support and help with upgrades or training, please contact CSSI.

GP Tip – Printing a Trial Balance

Have you ever had the need for a trial balance for just certain account numbers?  For example, you would like GL Trial Balance detail of accounts 6100 and 6520, but not the accounts in between, so you can’t use a range. You can create your custom report using the GP Trial Balance and Navigation Lists!

1. Open the Financial Area page and click on Accounts in the Navigation Pane to generate your list of GL Accounts.

2. Create a filter for the accounts you want to see.  Select Add Filter, then enter the accounts you want in your report.  When finished select the right pointing arrow to apply the filter you created.  The accounts matching the filter will be displayed.

3. Mark the accounts you want included in the report.  To select all accounts, select the checkbox in the header.

4. Select Reports > Print Trial Balance

5. Select Print and GP will generate a standard Trial Balance in summary or detail (Include details).

6. You can then save the filtered list by clicking on the ‘Accounts (read only)’ menu and choosing a name for the list so you can use it again later.  You will simply have to enter the checkmark to select the accounts to be used in the report and then select print.

GP Support from CSSI

For GP support and help with upgrades or training, please contact CSSI.

GP Tip: Taking Non-Qualifying Vendor Discounts

As you know, GP will only automatically deduct vendor terms discounts if you are paying invoices before or on their discount dates.

You can also take discounts AFTER the discount date by checking “Take Non-Qualifying Discounts” box in the Build Payment Batch window.

This option is not available if you mark the Exclude Expired Discounts from Payments option in the Payables Management Setup window (shown below) or for a purchasing prepayment batch.

Another helpful option in the setup window above is “Allow Summary Post to Checkbook for EFT/CC”.  This feature was added in GP 18.5.  It allows you to post EFT and credit card AP payment batches to the bank reconciliation in a lump sum, rather than as individual amounts.  This makes bank reconciliation much easier because these amounts most likely appear on your bank statement as a total amount.

Need GP Help?

CSSI is available for GP support and training. Let our experts help you improve your GP setup. Please contact us for help.

Create a Financial Reports Shortcut in GP

Are you looking to streamline your workflow in Dynamics GP? Adding a Management Reporter shortcut to your Financial Reports menu will allow you to launch the Report Designer from with Dynamics GP. Follow these steps to create the shortcut.

Click on the Home tab in the Navigation List. Then go to the left side of the screen and right-click to open a shortcut menu. From the menu select Add > Add External Shortcut. This will open the Add External Shortcut Window.

On the Add External Shortcut Menu enter a name for your shortcut. Then, on the command line, browse to the executable that will launch Report Designer. In a default installation the path is: C:\Program Files\Microsoft Dynamics ERP\Management Reporter\2.1\Client\ReportDesigner.exe. Click Done after the path has been added.

The new Management Reporter shortcut will now appear under Report Shortcuts. Simply click the Management Reporter shortcut and it will launch Management Reporter, allowing you to generate your financial reports quickly and easily.

Looking for Dynamics GP Support or Upgrade Help?

CSSI can help you with your next GP upgrade, as well as providing technical support and training for your team. Please contact us for help.

GP Tip: How to bring back the navigation pane

Have you ever had the Navigation Pane disappear while using GP?  Here’s how you can bring it back yourself!

The solution is to click the Layout Button in the top right corner of Microsoft Dynamics GP.  Unselect and then re-select the Navigation Pane option.

When you select the Navigation Pane option the Navigation Pane will then be displayed in GP.

That’s it!

Need GP Technical Support

If you would like GP help, training, or upgrade support, the team of GP experts at CSSI would be glad to help. Please contact us for GP help.

GP Tip: Dynamics GP – Account Rollups

The GP Account Rollup Inquiry screen allows you to summarize information from GL several accounts and display this information in several ways such as Current and Previous years, Actuals vs. Budgets with variances.  Use this as a quick way to view a sum of a group of related accounts.

1. Go to Financial > Inquiry > Account Rollup
2. Enter an Option ID
3. Press the Tab key
4. Select Yes to add this option
5. In the Sort By drop-down list, select the G/L account segment you want to use to sort the information that will be displayed. 
6. Select the number of columns of information you want to display
7. For each column of information, enter the column heading you want to use, and the Type of information you want to display.  If you selected Budget type, click on the lookup icon to the right of Selection to select your Budget ID.  If you selected Calculated type, click on the blue arrow to the right of Selection to open the Account Rollup Inquiry Calculated Column window. 

8. Enter restrictions to define the account segment ranges you want to use in this inquiry.  You can set up multiple ranges for a single segment.
9. Click on Save
10. Go back to the Option ID you created and click on Redisplay.  You can choose to display either Net Change amounts or Period Balances.
11. Click to select an amount then drill-down on one of the blue underlined column headers to see the account breakdown.

Need GP Help?

Need more help with GP? Please contact CSSI for expert GP support.

Are you excited about data? Data increasingly provides a competitive advantage to today’s leading organization. How effectively are you utilizing data within your organization?

  • Do the right people have easy access to the data they need to make decisions?
  • Do you have informative, easy-to-share dashboards in place to monitor business results?
  • Are your reports flexible and dynamic? Are non-technical users able to slice and dice the data?
  • Are you able to tie together and compile data stockpiled in various databases throughout your organization?
  • If the answer to any or all of the above is “no”, then how much could you improve your business by turning “no” to “yes”?

In the following webinar, we discuss the power of analytics and Microsoft’s Power BI software, a tool which puts powerful analytical capabilities in the hands of even non-technical users. Power BI enables you to create dashboards and dynamic reports, pushing data down to the users who need it.

Learn more about how CSSI can help you utilize and implement Power BI:

  • This field is for validation purposes and should be left unchanged.