Tag Archive for "gp"
Understanding the Named Printers Feature in GP

What is GP’s Named Printers Feature?

The Named Printers feature allows you to default certain reports to certain printers and/or printer drawers.  Instead of having to remember to select the correct printer for different reports, have GP automatically send those reports to the correct printer.

For instance, if you keep paper in one drawer of a printer and checks in a second drawer of that printer, you can use Named Printers to tell GP to automatically pull from the second printer drawer when printing checks.

To set up Named Printers, go to Microsoft Dynamics GP > Tools > Setup > System > Named Printers.

The first time you open Named Printers, you will be prompted to enter a unique Machine ID.  You can accept the default machine ID.

You must first assign a printer as the Default.

You can then set up different Printer IDs assigned to different printers.

Once you have your Printer IDs created, you can then assign reports to these printers by clicking on the Assign button.

The Printer Class options are:

  • System: Printer IDs assigned to the System class will be available to all combinations of users and companies. This selection is best for general purpose printers loaded with plain paper.
  • User: Printer IDs assigned to a User class will be available to only a single user for all companies. Use this selection for printers that are only accessible to certain people.
  • Company: Printer IDs assigned to a Company class will be available to all users for a single company. Select this option for documents that are printed on forms with the company name preprinted on them.
  • User & Company: Printer IDs assigned to a User & Company class will be available only to a specified user and company combination.
  • Any Printer ID: If you select Any Printer ID, you can choose from any available printer ID set up on the workstation when you print the report. You can’t assign a printer to this task in the Assign Named Printers window.
  • Manual Selection:   If you select Manual Selection, you will not assign a printer to the task. Instead, when you print the report, the operating system’s Print Setup window will open, and you can choose the printer and printer settings.
  • None: This is the default selection, indicating that you haven’t selected a printer for the task.

This setup must be done at each workstation that will use Named Printers.

Need GP Support?

If you need technical support or training with Dynamics GP, please contact our experts at CSSI.

General Ledger Mass Modify

Mass Modify is a tool that can help you quickly create, update, or renumber large groups of General Ledger accounts all at once.

You can generate many new GL accounts based on existing ones using:

  • Segment (change one segment across a range)
  • Range (copy a block of accounts)
  • Mask (replace part of an account number)
  • Wildcard (select accounts based on patterns)

This is useful when:

  • Adding a new department
  • Rolling out new natural accounts
  • Creating new cost centers

NOTE: Before using this tool, be sure to have a current backup!

To copy a range of accounts:

  1. Go to Financial > Cards > Mass Modify
  2. Select Copy in the Modify field
  3. Enter the range of accounts you want to modify in the From and To fields
  4. In the New Account Mask, enter the new segment number
  5. For Display, choose Selected Range to show the range of accounts to be copied
  6. Click on Modify to complete the process
  7. The fields in the window will be cleared when the process has been completed

GP Upgrade Support

CSSI can help with your GP upgrades! Our experienced GP team can guide you through the process of getting current, even if you have slipped several versions behind! Contact us for GP upgrade help.

How to Allocate Inventory to Multiple Bins In GP

Did you know that Microsoft Dynamics GP provides the ability to track inventory quantities in more than one bin location within a site/warehouse?  By default, GP lets you set up one “default” bin per item/site, but if you need more detailed tracking—such as stock spread across aisles, shelves, or zones—you enable Multiple Bins in the Inventory Control module.
 
You can then assign default bins for different types of transactions for each item/site combination.

The Bin Quantity Inquiry window lists all the bins containing quantities for a particular item.

This does add an extra step to each inventory-related type of transaction because GP now must track not just what site an item is in, but also which bin(s) it is stored in. There are certain steps that need to be followed when you enable this feature. 

Need GP Support for Inventory Management?

If you’re looking to improve your inventory management, CSSI offers a warehouse management software solution (WMS) specifically written for GP users. For help with WMS or inventory management, please contact CSSI to discuss.

Document Attachments in GP

Are you aware of how easy it is to attach documents to GP transactions and master records?  Document Attachment functionality was introduced in GP 2013 R2 and has gotten more robust in later releases.

1. Document Attachment Setup

  • To enable Document Attachment, go to Microsoft Dynamics GP > Tools > Setup > Company > Document Attachment Setup
  • Check the “Allow Document Attachments” box

Press the F1 key (or go to Help > About This Window) for more information on the other setup options in this window

2. Using Document Attachment
• Open almost any GP window, select a record then click on the Attach button

  • Or click on the Notes icon then click the paper clip icon here
  • Click on the Scan button in the Document Attachment Management window
  • If you already have a scanned image, you can click on the Attach button to browse to that image file.
  • You can then view the status of an attachment by clicking on it to select it then click on the blue arrow to the right of Date.  This will show you the date and the time a user has attached, deleted, or scanned the image.  If, in the setup, you marked to allow a document to flow, this inquiry screen will also show the date and time the document flowed to a transaction.

Contact CSSI for GP Support

Please contact CSSI for GP support, training, and upgrades. Our team of experts is ready to help.

Create a Financial Reports Shortcut in GP

Are you looking to streamline your workflow in Dynamics GP? Adding a Management Reporter shortcut to your Financial Reports menu will allow you to launch the Report Designer from with Dynamics GP. Follow these steps to create the shortcut.

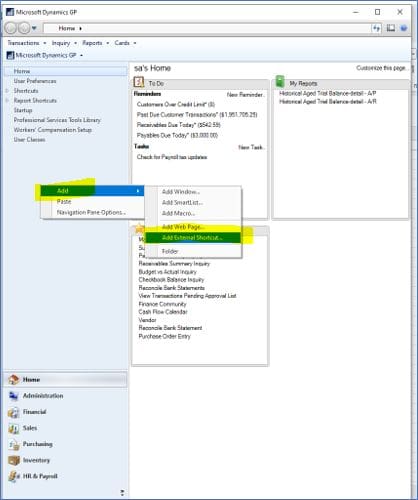
Click on the Home tab in the Navigation List. Then go to the left side of the screen and right-click to open a shortcut menu. From the menu select Add > Add External Shortcut. This will open the Add External Shortcut Window.

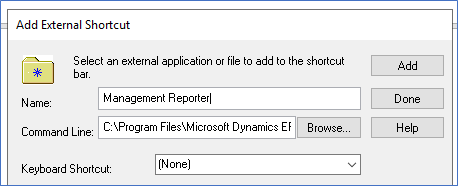
On the Add External Shortcut Menu enter a name for your shortcut. Then, on the command line, browse to the executable that will launch Report Designer. In a default installation the path is: C:\Program Files\Microsoft Dynamics ERP\Management Reporter\2.1\Client\ReportDesigner.exe. Click Done after the path has been added.

The new Management Reporter shortcut will now appear under Report Shortcuts. Simply click the Management Reporter shortcut and it will launch Management Reporter, allowing you to generate your financial reports quickly and easily.

Looking for Dynamics GP Support or Upgrade Help?

CSSI can help you with your next GP upgrade, as well as providing technical support and training for your team. Please contact us for help.

Have you ever had the need to print a trial balance containing non-sequential account numbers?  Say you would like to see a GL Trial Balance detail for just a couple of main segment account numbers, but do not want to see all the accounts in between. 

Here is an example.  We need to see GL detail for accounts containing 6100 and 6520 as their main segments.  But we do not want to see any other accounts on our report. 

You can create this custom report using the GL Trial Balance and GL Navigation Lists!

1. Go to the Financial page

      2. Click on Accounts in the Navigation pane and wait for your accounts to list

      3. Click on Add Filter

      4. Enter your first filter then click on the down arrow to the right of the second Add Filter and select the “Or” condition

      5. Add your second filter then click on the arrow circled below to Apply Filter

      6. The filtered account list will appear

      7. Select the accounts to be included on the report.  Select all reports by checking the checkbox on the header row.

        8. Click on the down arrow under Reports and select Print Trial Balance

        9. Choose whether you want to Include Details.  Select the Year then click on Print.

        10.  You can save the filter list for future use.  Click on Accounts (read only) at the top of the screen and select Save As

        11.   Type in a name and click on OK

        12.  The new list will now on the Financial Navigation pane under Accounts

        Note:  Navigation lists are available for all GP modules.

        That’s it!

        Need GP Training or Support?

        CSSI offers experienced GP experts who are available for training, technical support, and upgrades. Please contact CSSI to discuss your GP needs.

        Copy/Paste General Journal Entries from Excel

        This is an oldie but goodie.  Simplify journal entries by copying and pasting into GP from Excel.

        1. Set up the Excel Spreadsheet with four columns in this order:

        a. Account Description, Account, Debit Amount, Credit Amount
        b. Add a row for each line of data entry and create a balanced General Journal entry

        2. Select and copy the data from the Excel spreadsheet.  Do not copy the column headings.

        3. Open the Financial Transaction Entry Window by going Financial > Transaction > General

        • Create a Batch ID (Optional)
        • Enter the Transaction Type (Standard or Reversing)Enter the Transaction Date
        • Source Document Code will default
        • Enter Reference
        • Currency ID will default

        4. Place the cursor in the Account field and click on the Paste option at the top of the menu bar

        5. The paste action will populate the journal entry

        6. Save the transaction in a batch or Post

          Contact us for GP Help

          If you need help or support with Dynamics GP, please contact CSSI.

          Have you ever had to see if a user has access to a particular company in GP? If you have a lot of company databases you used to have to scroll through the entire list of companies to check the user’s access. You can now sort and search by company name or company ID making the task a lot faster. This feature was added in Microsoft Dynamics GP October 2019.

          To use this tool, navigate to Microsoft Dynamics GP > Tools > Setup > System > User Access. Select the user you want to check and then select the drop down by Company Name and select by Company ID or by Company Name.

          user access setup

          The example shows by Company Name. Enter the Company Name in the Find by Company Name box and only that company will be displayed. You can then click whether or not the user has access to the company.

          user access setup by company name

          Do you have credit limits set up for your customers in GP? If so, you can easily see if a customer is over their credit limit by enabling the display icon. This feature was added in GP 2015 R2.
          To set up this feature go to Microsoft Dynamics GP > Tools > Setup > Sales > Receivables and go to the Options section and select the checkboxes for Display Over Credit Icon and Warn if Customer Over Credit.

          display over credit icon

          You can also require a password to allow the credit limit to be overridden. The setup for that is at Microsoft Dynamics GP > Tools > Setup > Sales > Receivables.

          exceed credit limit

          The Over Credit Limit icon is displayed on the various customer related GP windows whenever a customer is over their credit limit.

          customer maintenance
          visual indicator customer over credit limit
          on hold warning

          By the way, there’s a built-in SmartList that lists all customers over their credit limit.

          customers over credit limit

          Microsoft Dynamics GP – New Features for 2021

          As we start off a fresh new year, it’s a great time to update Microsoft Dynamics GP users on on all the new functionality in Dynamics GP for 2021! In this on-demand webinar, GP consultant Deborah Newcomer from CSSI brings you up to date on GP ERP software, discusses each new feature, and takes a look at the road map for this ERP solution. We think that Dynamics GP customers will find this discussion helpful.

          Some of the content discussed in this on-demand webinar (Whats new in dynamics GP 2021) includes:

          General Updates

          Prior GP lifecycle plan: Prior to 2021, Microsoft published fixed dates for end of mainstream support and end of extended support. Please note: if you are running a version of GP which is either beyond or approaching its support end date, it’s time for a GP upgrade: contact CSSI to discuss your options.

          GP support dates

          New GP Lifecycle policy: Microsoft has committed to releasing 2 or 3 updates per year. You are considered current if you install at least 1 upgrade per year. Keeping current with updates not only gives you access to new functionality such as the features discussed below, it also provides you with bug fixes and patches to keep you secure.

          GP New Lifecycle Policy

          New GP Features for 2021

          The following topics are covered in the webinar recording:

          New GP Features – System Manager

          • Why you should periodically run ‘check links’. You can now schedule ‘check links’.
          GP Scheduling Check Links
          • Bulk move/remove columns in Smartlist.
          GP Bulk move columns in SmartList
          • Screen outputs automatically open in a maximized state.
          • You can now use a Named Printer when printing Word Templates.
          GP assign named printers

          New GP Features – General Ledger

          • Transaction entry contains new GP user defined fields.
          GP - GL - new user defined fields
          • Reconcile financial information – a useful feature when changing fiscal periods.
          GP reconcile financial information
          • Transaction entry: Excel copy/paste now uses decimal places assigned to each currency
          GP excel copy-paste
          • Payables management – use copy/paste to create payables transactions.
          GP copy paste payables transactions

          New GP Features – Purchasing

          • Vendor maintenance includes a new DBA field.
          GP vendor maintenance new DBA field
          • Vendor maintenance includes a 1099 NEC (non employee compensation) option.
          GP 1099 NEC options
          • Payables management setup – vendor map and transaction type new feature.
          GP vendor map transaction type

          GP New Feature – Inventory

          • Export stock schedules to a spreadsheet, make updates, and import data back into GP. Great workflow improvement for some.
          GP stock count schedule update

          New GP Features – Sales Order Processing

          • Option to print sales documents, even when sent via email.
          GP option to print sales documents even when emailed

          New GP Feature – HR

          • Automatically mask Social Security numbers on many HR reports.
          GP social security mask

          Who is CSSI?

          CSSI Technologies is a Microsoft partner with over 20 years of experience as a GP consultant. We provide training, support, and consulting for companies which utilize Dynamics GP ERP software. We believe that Microsoft Dynamics GP users deserve great guidance and support. Wondering if you are receiving great support from your GP provider?

          To learn more about how CSSI can assist your business with the GP ERP system, please contact us to get started.