Do you or any of your users have trouble logging into GP sometimes because the maximum number of users are already logged in? Maybe you need to review which users are performing which tasks.
The 3 Types of Users In Dynamics GP
Full User. This is the most common type of user. This user has full access to do anything in GP, but they are limited based on the security permissions assigned to them within GP.
Limited User. These users can view data only, with inquires, reports and SmartLists. They cannot post transactions or change master records. PLUS, the cost of a Limited User is 80% less than the cost of a full user.
Self Service. These users can only access the Self Service modules, which are used to enter PO requisitions, payroll expenses and timecards, and project expenses and timesheets.
You can see which users are currently logged into GP by going to Administration > Utilities > System > User Activity. Here you can remove (Delete) users who should be logged out.
Keep in mind that, with the use of refreshable Excel spreadsheets, you can have non-GP users viewing GP data outside of the system.
This is a repeat of a tip we published in February of 2022 but, with the rise in the number of check fraud cases, this may be a good time to start using Safe Pay (also known as Positive Pay).
Microsoft Dynamics GP has this built-in tool to assist in the prevention of check and ACH fraud. It’s a process that involves creating a file of payables payments (checks and EFT’s) that you submit to your bank.
Any payments presented to your bank are compared to your company’s issued Safe Pay file. If a payment does not match the information in the file, your bank will contact you for authorization.
If you do not see this option in your GP, then it either needs to be installed and/or registered.
It requires a few setup steps. You first need to contact your bank to confirm that they offer this service and then ask them for file specifications. This file format gets created in GP by going to Financial > Routines > Safe Pay > Configurator, where you select an Output file Type and define the types of records lines and record fields per line.
Next, go to Financial > Routines > Safe Pay > Upload Maintenance. Select the Bank Upload ID (Bank Format) that was created in the first step. Link it to a Bank ID and a Checkbook ID. Select the Upload Filename and Path where you want the file to be created. The same file name will be used every time. (The file gets overwritten each time you create a new file. Have no fear, though, you can always recreate a file from history.)
If you are using EFT processing in GP, be sure to check the “Include EFT Transactions” checkbox at the bottom of the window.
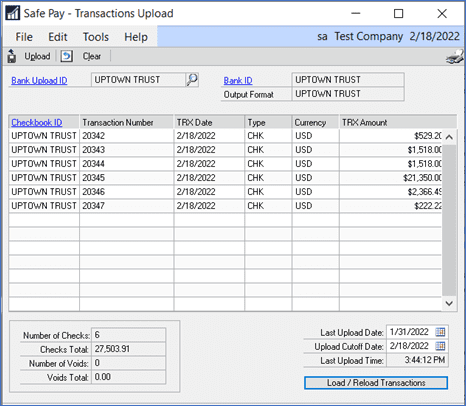
Once you are ready to create a Safe Pay file, after you have posted a batch of payments, go to Financial > Routines > Safe Pay >Transaction Upload. Select the Bank Upload ID. Enter a Last Upload Date and Upload Cutoff Date. Click on the Load/Reload Transactions button. The payments to be included in the file will appear. Click on Upload to create the file.
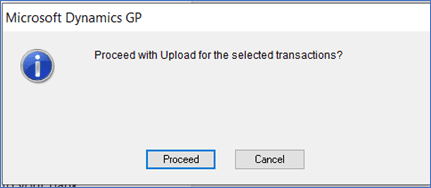
Click on Proceed when the window below appears.
Click on OK again.
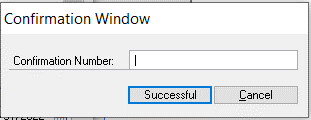
If your bank provides you with a confirmation number when the file is submitted, you can enter that in the next window. If you do not have a confirmation number, just enter any number then click on Successful.
You can then print a report listing all the payments that were included in the file.
To recreate a Safe Pay file, go to Financial > Routines > Safe Pay >Transactions History. Select your Bank Upload ID. Click on the left and right arrows to scroll through previously created uploads. Click on the Upload button the recreate the file.
Need More GP Support?
For more helpful Dynamics GP support, contact the pros at CSSI. We’d be happy to help. Get GP help here.
Monitor your data with GP Home Page and a SmartList
Use your GP Home Page and a SmartList to help you monitor your data. Use reminders to view customers who have gone over their credit limit. Or use a reminder to list all inventory items that have a on hand quantity that is below the item’s reorder limit. Or keep an eye on purchase orders created that exceed a certain dollar amount.
First, create a new SmartList favorite that displays the columns you want to see and that is filtered on whatever criteria is needed.
Let’s work with the example of seeing all purchase orders over a specific dollar amount.
First create the SmartList favorite that will give you the information you need, such as what is shown in the screenshot below.
This list is filtered on
“Released” PO’s only, meaning they have been printed but not yet received or invoiced.
PO’s with a Remaining Subtotal greater than $5,000
PO Status not equal to “Canceled”
Once your new SmartList favorite is displaying the information that you want, now we can save it as a Reminder on your Home Page.
Click on the Favorites button. Enter a new Name then click on Add and select Add favorite and reminder.
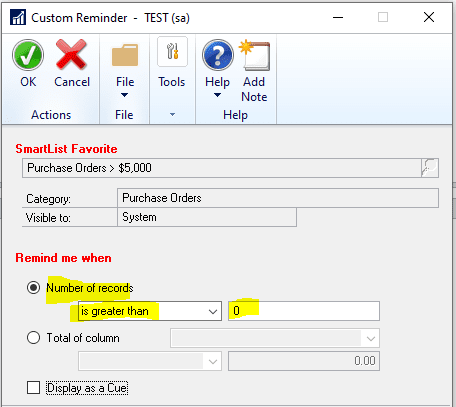
In the Custom Reminder window, under Remind me when, select Number of Records, choose “is greater than” and enter 0. This means show my SmartList as a reminder only when it’s returning more than 0 records (rows). Click on OK.
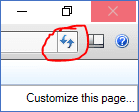
Go to your Home Page. You may need to refresh it if you had been on the Home Page while creating your reminder. You can refresh your Home page by clicking on the double blue arrows in the upper right-hand corner. Or go to another page then come back to the home page.
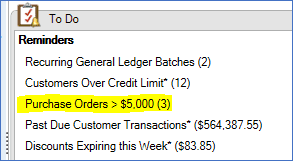
Here is my new Reminder on my Home page. The “3” in parenthesis indicates that I have 3 records on the SmartList. I can click on it and it will take me right to that SmartList.
Here’s an easy way to handle cash received from a vendor, whether it’s a vendor rebate or a refund of an overpayment. Use the Return document type in Payables Transaction Entry.
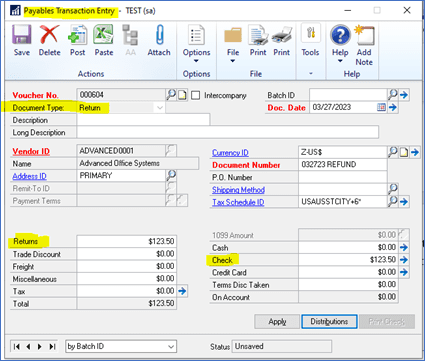
Go to Purchasing > Transactions > Transaction Entry and change the Document Type to Return. Fill in all the header information as usual: Document Date, Vendor ID, Document Number, etc.
Enter the amount received from the vendor in both the Returns and the Check fields.
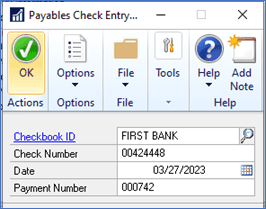
Once you tab off the Check field, the Payables Check Entry window opens where you select which Checkbook ID this payment will be deposited in. You can also enter the vendor’s check number here. Click on OK when finished.
Then, click on the Distributions window to verify the GL accounts that will be posted to. The CASH account defaults from the Checkbook ID selected above. The PURCH account defaults from the Purchases account assigned to the vendor but it can be changed. (Never change the CASH GL account as it’s assigned to the checkbook.)
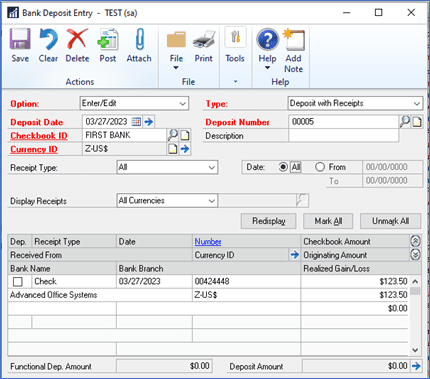
Once the return is posted, it will be waiting to be deposited in the Bank Deposit Entry window.
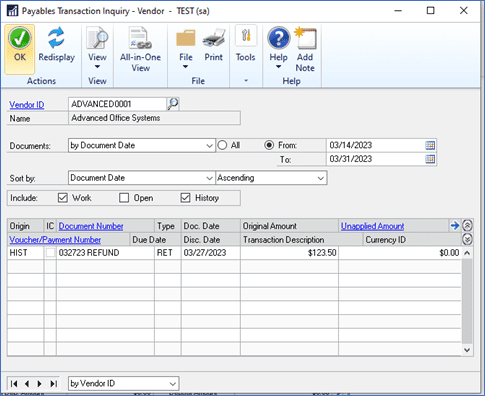
You can see in the Payables Transaction Inquiry window that the Return transaction has been fully applied and, therefore, moved directly to History.
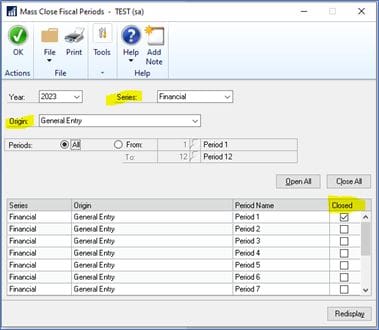
Did you know that Dynamics GP enables you to prevent users from posting to prior fiscal periods by closing fiscal periods? Here’s how to take advantage of the feature.
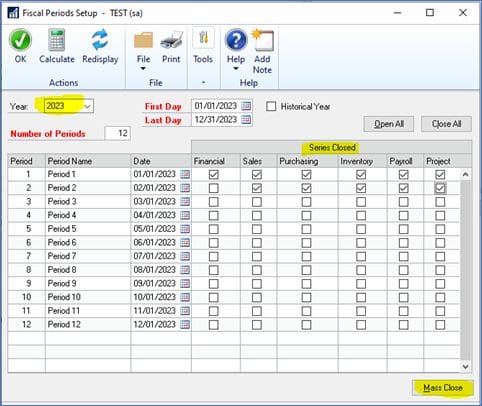
Go to Microsoft Dynamics GP > Tools > Setup > Company > Fiscal Periods.
Also be sure to close all the periods for a year that has just been closed. Because GP allows you to post back to the last closed year, you’ll want to be sure all the periods and modules are closed for that year.
You can always go back and uncheck a period to temporarily reopen it.
You also have the ability to leave just one particular type of transaction open. Click on the Mass Close button (highlighted above). Select a Series and Origin and reopen a period for just that transaction type.
For GP payroll processors, did you know that you can reprint a W-2 form from a prior year? Just go to the Print W-2 Forms window and select a prior year. Select an employee in the From and To Employee ID fields. Select to print W-2 forms and select a Form Type. Click on Print.
We hope you found this tip on reprinting prior W-2 forms to be helpful. For additional GP support on this or any GP topic, please contact CSSI.
Controlling the Posting of Future-Dated Transactions in GP
This is a free tool that is part of the Professional Services Tools Library (PSTL) toolkit. It prevents the posting of future-dated transactions in subsidiary modules.
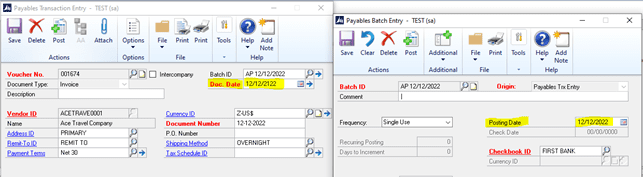
If your Posting Setup is set to post to G/L by batch date, GP would allow a document date to be used even though that fiscal period is not yet set up in GP.
If the Posting date is coming from the batch ID, then GP would accept an incorrectly entered Document date. In the example below, the document date contains a typo. But it posted to AP! And it won’t appear on an aging report as of the current date.
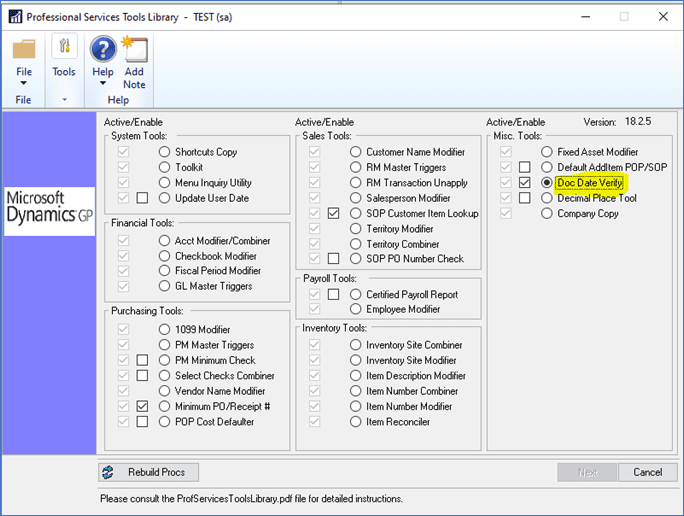
To prevent this, enable Doc Date Verify. Launch PSTL by selecting it from the GP Navigation Pane.
In the Misc. Tools section, click on both the radio button and the check box next to Doc Date Verify. Click on the X in the upper right-hand corner when finished.
This must be enabled on each workstation.
Once this is enabled, any time a future date is entered into a transaction, you’ll get the error message below.
Doc Date Verify works in the following windows:
Payables Transaction Entry
Receivables Transaction Entry
Invoice Entry
Payables Manual Payment Entry
Sales Transaction Entry
Inventory Transaction Entry
Cash Receipts Entry
Purchase Order Entry
Receivings Transaction Entry
Purchasing Invoice Entry
Get Help With GP
We hope that this tip is helpful for you. To get more help with GP, please contact CSSI. We can support your upgrades, enhancements, and team training.
GP Purchase Order Quantity Tolerances
Receipts against purchase orders don’t always match up perfectly with what you expected to receive. Here’s how to set up Shortage and Overage quantity tolerance percentages in GP to limit the quantity received on a PO receivings transaction.
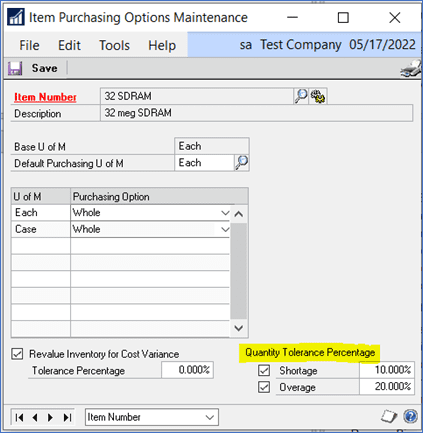
1. To enter percentages for sales inventory type items, go to Inventory > Cards > Item Purchasing Options.
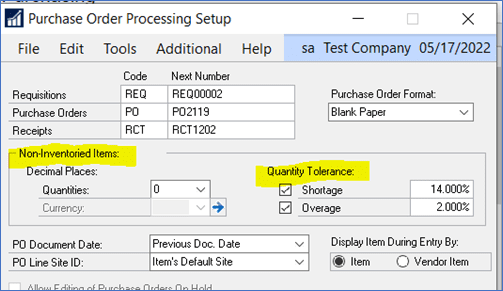
2. To enter default percentages for non-inventoried items, go to Purchasing > Setup > Purchase Order Processing.
3. When you try to Receive an item, greater than the Overage tolerance, you’ll receive this message.
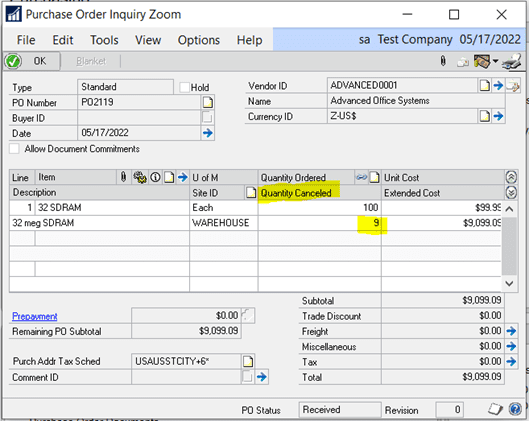
4. If you receive a quantity less than the Shortage tolerance, the remaining quantity will automatically be cancelled on the PO.
For instance, if you order a quantity of 100, receive 91 and your shortage tolerance is 10% then the remaining 9 will be cancelled.
Need More GP Help?
That’s it! If you need more support for setting up purchase order quantity tolerances in GP, contact the GP team at CSSI. We are happy to offer helpful, friendly GP support for you and your team!
Issue Checks To Vendors Prior to Receiving the Items
Did you know that Dynamics GP has functionality allowing you to create a check to a vendor against a PO prior to receiving the items and posting the invoice? Here’s how to do it:
1. Set up the PO module to allow prepayments
Go to Purchasing > Setup > Purchase Order Processing
In the Prepayment Setup section, check the Allow Purchase Order Prepayments box.
You can require a password by filling in the Prepayment Password field.
Assign a Prepayment G/L Account for the prepayment to post to.
2. Create a purchase order and the prepayment
Create a PO as usual
Fill in the Prepayment amount
The not-equal sign (≠) means that the prepayment amount has not yet been paid
You can enter a prepayment for a New, Released, or Change Order purchase order that hasn’t been received or invoiced against.
You can only enter one prepayment for each purchase order.
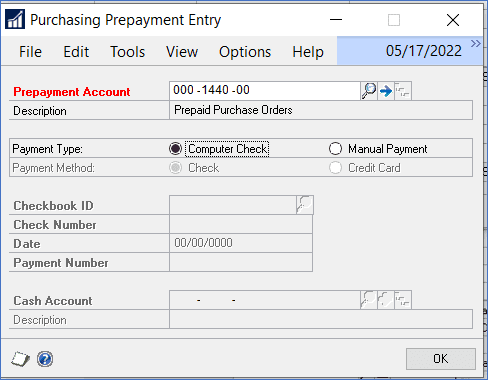
You can click on the blue arrow to the right of the Prepayment amount to change the default Prepayment Account and/or select Manual Payment instead of Computer Check.
Print and save the purchase order
3. Create the prepayment check
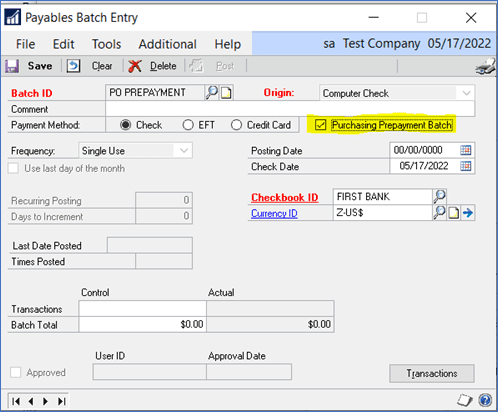
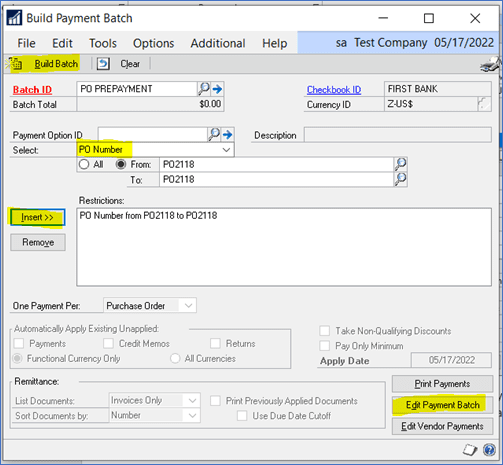
Go to Purchasing > Transactions > Build Payment Batch
Create a Batch ID
In the Payables Batch Entry window, check the Purchasing Prepayment Batch box
Select the Checkbook ID then Save
Next you have several options. You can select the PO Number(s) to be paid. Or you can just click on Build Batch and GP will create a batch of all PO prepayments.
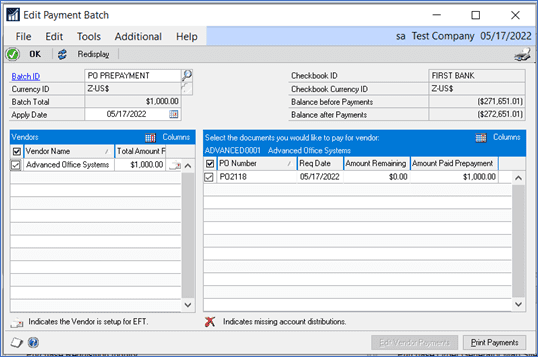
Or you can click on Edit Payment Batch and only those vendors who are getting prepayments will appear.
Click to Print Payments. The PO number will be printed on the check stub.
Post the batch.
The check transaction(s) will debit Cash and credit the Prepayment account.
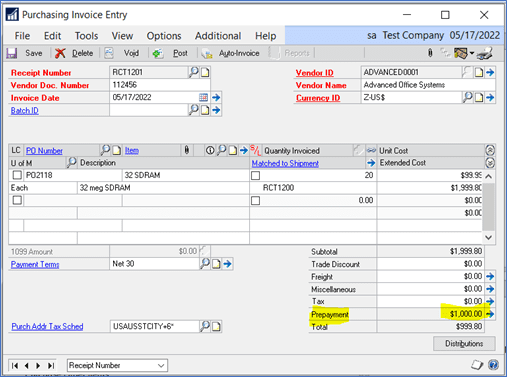
4. When you create the PO Invoice, you’ll see the Prepayment amount reduces the Total invoice amount.
When you post the invoice, the Prepayment account will be debited
How To Get More Help
Do you have questions or need more help with purchase order prepayment or any other GP feature? Contact the GP team at CSSI, we’d be happy to help.
Register now for a great CSSI webinar on Nov. 11….
There is a tremendous amount of vital operational data locked away in your GP databases that traditional reporting does not and cannot analyze. Harnessing this underutilized and constantly growing data is absolutely critical to your decision-making process and means the difference between success and failure for your organization.
Webinar Registration: Learn About Power BI Report Pack For GP
Join us for a webinar on Nov 11, 2021 at 11:00 AM EST. Attendance is limited so register now to assure your seat at the Power BI table. After registering, you will receive a confirmation email containing information about joining the webinar.
The Power BI – Report Pack for Dynamics GP is an affordable Data Analytics and AI reporting product containing 100+ pre-built dashboard reports. These pre-built Dashboard Reports surface all of your GP data spanning GL, AR, AP, Sales, and Revenue Analysis, Inventory, and Purchasing. The Report Pack will give you a real 360-degree view of your entire operation using data analytics and AI enabling your decision makers to make quicker and more data-driven decisions for your organization. There is no other pre-built Power BI solution on the market and CSSI Technologies has this solution.