Do you know how to tighten the reins on what can post where in GP?
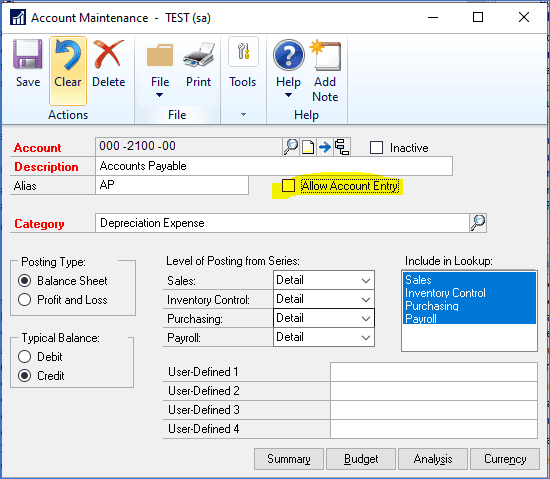
A control account is an account within the general ledger that corresponds to a subsidiary ledger, such as Accounts Payable, Accounts Receivable, Cash and Inventory. Normally, general journal entries should not be posted to these accounts because then they will no longer tie out to subsidiary reports.
You can prevent users from posting to these accounts by going to Financial > Cards > Account and unchecking the “Allow Account Entry” checkbox.
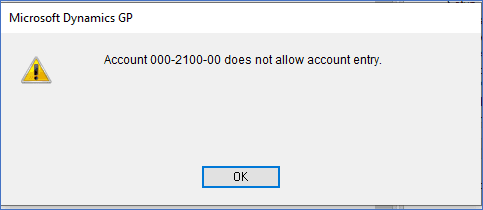
If a user tries to post a journal entry to this account, they will get the message below.
These accounts can still be posted to through the subsidiary module. And you can go back to Account Maintenance and temporarily recheck that box as needed.
GP Tip – Federal Payroll Tax Table Update Instructions for GP
Wondering how to update the federal payroll tax table in Dynamics GP? Here is a helpful explainer:
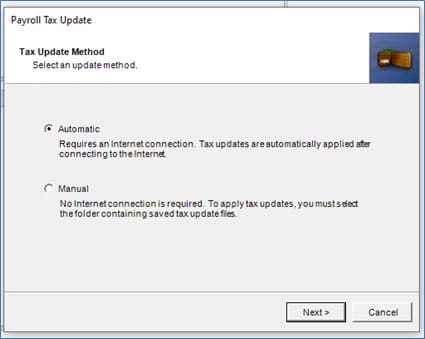
1) Ask all users log out of GP 2) Log into GP as the ‘sa’ user 3) Go to Microsoft Dynamics GP > Maintenance > U.S. Payroll Updates > Check for Tax Updates 4) Select the Automatic method then click Next
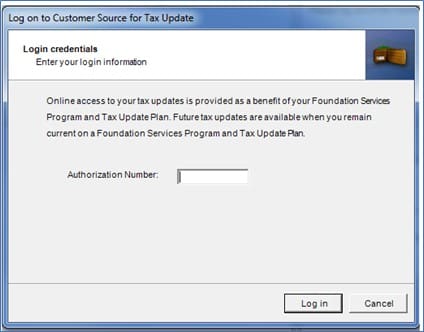
5) Enter your Authorization Number. This is your Authorized number with CustomerSource, which is normally your phone number (with the area code and no punctuation). Click on Login.
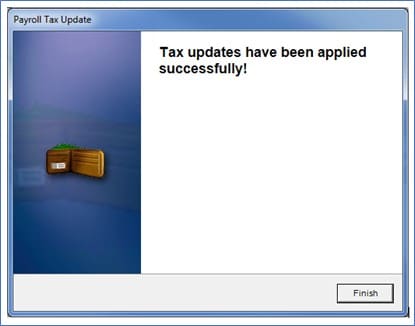
6) The tax tables will update. Click on Finish after the updates have been applied successfully.
7) You can verify that you have the latest tax update by going to Microsoft Dynamics GP > Tools > Setup > System > Payroll Tax. The “Last Tax Update” field should have the date of 1/19/18. 8) This updates Federal and State withholding taxes only 9) If you have a change to your state unemployment tax rate, go to HR & Payroll > Setup > Payroll > Unemployment Tax. Select the State and change the Tax Rate.
Do you have inventory items that you would like removed? Did you know that there is a process to accomplish this in Dynamics GP? Here’s how:
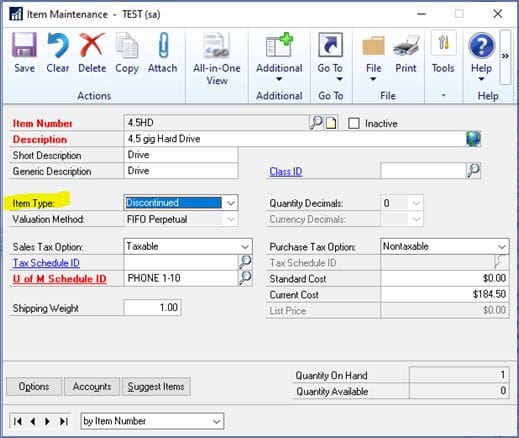
You can start preparing items to be removed during the year-end process by changing the item type to Discontinued. Go to Inventory > Cards > Item. Change the Type to Discontinued.
Items are tracked the same as Sales Inventory items in that you can still sell Quantities On Hand. You can also enter adjustments for the item and can delete the item when the quantity reaches zero.
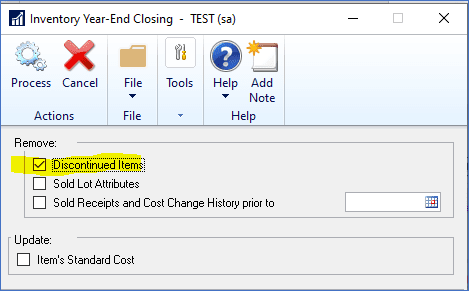
You can also remove Discontinued items during the Inventory Year-End process.
Mark this option to remove the records for discontinued items that have been completely sold. Items assigned the discontinued item type will be removed from the item records during the year-end closing process, unless there are quantities of the item, or one of the following is true:
The item does not exist on an open transaction (sales document, purchase order, unposted inventory transaction).
The item is assigned to a kit.
The item is a component of a bill of materials.
The item has one or more bills of materials of its own.
Are you taking advantage of the GP Fixed Assets module? It is included with your GP license. You can use Fixed Asset Management to set up, enter, and maintain asset records. You also can use Fixed Asset Management to complete the following tasks:
Calculate depreciation
Import information to Fixed Asset Management from other sources
Create and use asset groups to make maintaining asset records easier
Transfer an asset to a new general ledger account or property tax location
Retire an asset, partially retire an asset, or retire a group of assets
Add insurance, lease, and user-defined information
Track General Ledger information entered in Fixed Asset Management, such as additions, transfers, depreciation, retirement of assets, and other changes
If you are using Payables Management or Purchase Order Processing, you can track assets that originate in those modules and add them as fixed assets.
If you do not see Fixed Assets options on the GP Financial page, that means it just needs to be installed.
Do you find that sometimes your subledger reports don’t tie out to GL? Here is a tool that can help. It has been around since GP 10. This routine will generate an Excel spreadsheet showing both matched and unmatched transactions between the subsidiary module and GL. You can use it for Payables, Receivables, Inventory and Bank Reconciliation.
This process does not generate correcting transactions. However, it can help you determine the transaction differences that are listed.
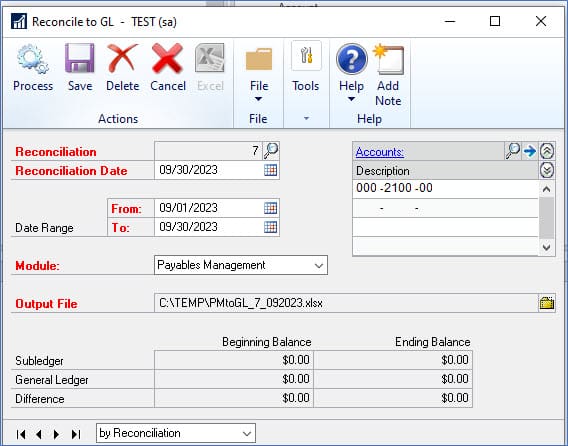
Go to Financial > Routines > Financial > Reconcile to GL.
Enter or select the Reconciliation number.
Enter the date for this reconciliation. It will default with the current date.
Enter the date range for the transactions to include in this reconciliation.
Select the Module to be reconciled.
Under Accounts, select the GL account that is tied to this module. For instance, if you have selected the Payables Management module, enter your Accounts Payable GL account(s).
Click on the folder to the right of Output File to select a file location for the Excel spreadsheet that will be created.
Click on Process to create the spreadsheet.
Anything that appears in the Unmatched section means that it posted to one side but not the other.
You can Save this reconcile for future reference or delete it.
The new GP 18.6 release is due out Monday, 10/2/2023. Here’s a quick summary of new features and program changes included in this release:
Application Updates
Financial Summary Inquiry adding Redisplay button
Reverse Fiscal Year End Close by company vs all companies’ users being out
Customer statements display open items only
More enhancements to the Print and Email Cash Receipts from 18.5
Email/Reprint Vendor Remittance with message fields
Print Sales Order Processing blank picking ticket template
Set Unit of Measure from the PO Requisition to the Purchase Order
Letter Writing Assistant Final Notice on Collection Letters
Format Workflow emails with item decimals
Project Time and Expense Workflow My Expenses/ Delegates Nav List
Project Time and Expense Workflow My Timesheets Nav List
Payroll Year-End Wage Report Formatting
Letter Writing Assistant Expiring Test in Human Resources
ALL Payables 1099 forms will print with LINES! No need to buy any forms!
Systems Updates
Ability to completely delete document attachments from system
Shared Mailbox with Multi-Factor Authentication (MFA)
Need Help Updating GP?
Are you running the latest version of GP? CSSI’s GP team is available to help you update and migrate to the latest edition, even if you’ve fallen behind over the years. Contact us to discuss!
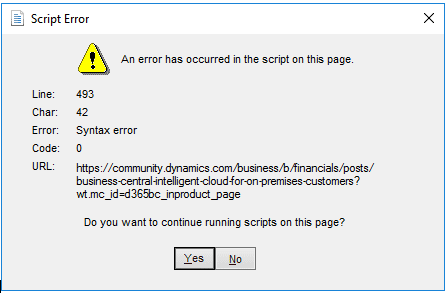
Are You Seeing a GP Script Error at Login?
If you or any of your GP users get a script error, like the one below, when they log into GP, it has to do with a setting on your GP Home Page.
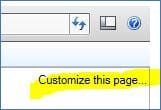
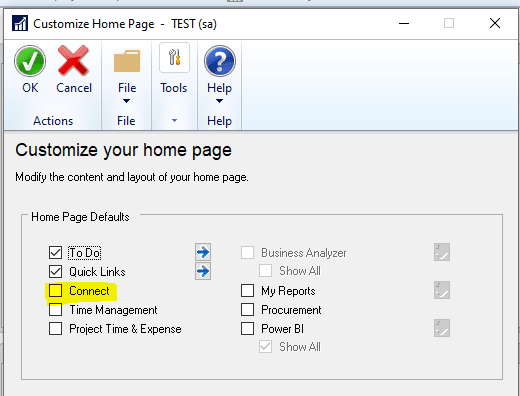
Click on No many times until the error goes away. Then click on “Customize this page” in the upper right-hand corner of the Home Page.
Uncheck the Connect checkbox.
Or you can disable the Connect option one user at a time by running the SQL script below against the DYNAMICS database. (Replace ‘xxxxxx’ with the GP user ID.)
UPDATE SY08100 SET Visible = 0 WHERE SectionID = 6 AND USERID = ‘xxxxxx’
If you want to disable it for all users just omit the last line that filters by a specific user ID.
Get More Help With GP
We hope this helps you solve GP script errors at the login screen. For more GP support, training, or upgrade help, please contact CSSI.
As a GP / Great Plains consultant for over 20 years, CSSI keeps tabs on Microsoft’s software roadmap. You may have noticed lots of marketing around Microsoft’s Dynamics 365 Business Central, and you may have felt some pressure to migrate. While CSSI will be here to support you if and when you decide to migrate, be aware that you do not need to do so in any currently foreseeable future.
Why Dynamics GP / Great Plains Remains So Popular
The community of Great Plains users is remarkably dedicated and passionate. Did you know that GP is used by over 20,000 customers?
Great Plains remains popular for many reasons:
GP meets the customer’s requirements.
Over time, the customer has integrated GP add-ons and customizations to create a highly specialized accounting system perfectly suited to its business needs.
The customer does not foresee benefits from migrating to a cloud-based ERP environment. In fact, the higher costs of cloud hosting become prohibitive.
Customers who do not regularly update to new GP versions do not want to be forced to do so.
Microsoft’s Commitment to Great Plains / GP
This past April, Microsoft made an announcement on the future of Microsoft Dynamics GP.
Their announcement states that, as of April 1, 2026 (3 years from now), there will be no new customer sales of Dynamics GP. As a steppingstone to this, from April 2025 there will be no new sales of GP Perpetual licenses. Subscription sales can still happen for the additional year.
HOWEVER, this will have no implications for existing customers! Existing customers can continue to purchase new licenses and modules after 2026. There will still be tax and other product updates for Dynamics GP, including lots of new features already planned for the next version (18.6), due to release October 2023. And this will continue with future versions 18.7, 18.8, etc.
Therefore, for existing Microsoft Dynamics GP customers, nothing has really changed. Microsoft has committed to continuing support and development of Dynamics GP to 2028 and beyond.
How CSSI Can Help You with GP
CSSI is pleased to support the community of 20,000 companies using Great Plains. We plan to continue to support GP for as long as our customers need us.
For help with Great Plains, please contact CSSI. We’d be pleased to help with friendly, practical GP support.
Getting a ‘Maximum Users Logged In’ Message?
Do you or any of your users have trouble logging into GP sometimes because the maximum number of users are already logged in? Maybe you need to review which users are performing which tasks.
The 3 Types of Users In Dynamics GP
Full User. This is the most common type of user. This user has full access to do anything in GP, but they are limited based on the security permissions assigned to them within GP.
Limited User. These users can view data only, with inquires, reports and SmartLists. They cannot post transactions or change master records. PLUS, the cost of a Limited User is 80% less than the cost of a full user.
Self Service. These users can only access the Self Service modules, which are used to enter PO requisitions, payroll expenses and timecards, and project expenses and timesheets.
You can see which users are currently logged into GP by going to Administration > Utilities > System > User Activity. Here you can remove (Delete) users who should be logged out.
Keep in mind that, with the use of refreshable Excel spreadsheets, you can have non-GP users viewing GP data outside of the system.
This is a repeat of a tip we published in February of 2022 but, with the rise in the number of check fraud cases, this may be a good time to start using Safe Pay (also known as Positive Pay).
Microsoft Dynamics GP has this built-in tool to assist in the prevention of check and ACH fraud. It’s a process that involves creating a file of payables payments (checks and EFT’s) that you submit to your bank.
Any payments presented to your bank are compared to your company’s issued Safe Pay file. If a payment does not match the information in the file, your bank will contact you for authorization.
If you do not see this option in your GP, then it either needs to be installed and/or registered.
It requires a few setup steps. You first need to contact your bank to confirm that they offer this service and then ask them for file specifications. This file format gets created in GP by going to Financial > Routines > Safe Pay > Configurator, where you select an Output file Type and define the types of records lines and record fields per line.
Next, go to Financial > Routines > Safe Pay > Upload Maintenance. Select the Bank Upload ID (Bank Format) that was created in the first step. Link it to a Bank ID and a Checkbook ID. Select the Upload Filename and Path where you want the file to be created. The same file name will be used every time. (The file gets overwritten each time you create a new file. Have no fear, though, you can always recreate a file from history.)
If you are using EFT processing in GP, be sure to check the “Include EFT Transactions” checkbox at the bottom of the window.
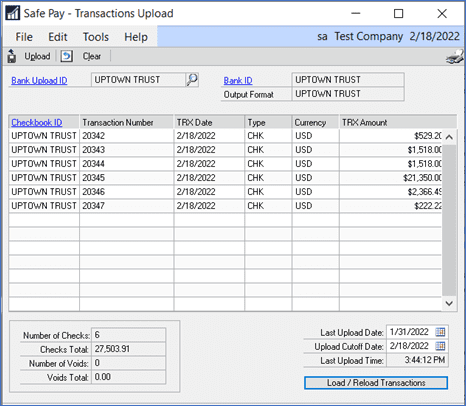
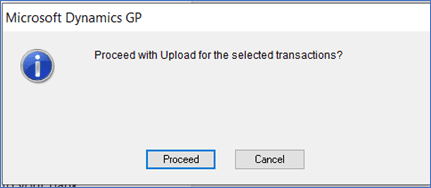
Once you are ready to create a Safe Pay file, after you have posted a batch of payments, go to Financial > Routines > Safe Pay >Transaction Upload. Select the Bank Upload ID. Enter a Last Upload Date and Upload Cutoff Date. Click on the Load/Reload Transactions button. The payments to be included in the file will appear. Click on Upload to create the file.
Click on Proceed when the window below appears.
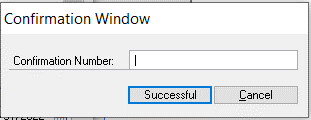
Click on OK again.
If your bank provides you with a confirmation number when the file is submitted, you can enter that in the next window. If you do not have a confirmation number, just enter any number then click on Successful.
You can then print a report listing all the payments that were included in the file.
To recreate a Safe Pay file, go to Financial > Routines > Safe Pay >Transactions History. Select your Bank Upload ID. Click on the left and right arrows to scroll through previously created uploads. Click on the Upload button the recreate the file.
Need More GP Support?
For more helpful Dynamics GP support, contact the pros at CSSI. We’d be happy to help. Get GP help here.